
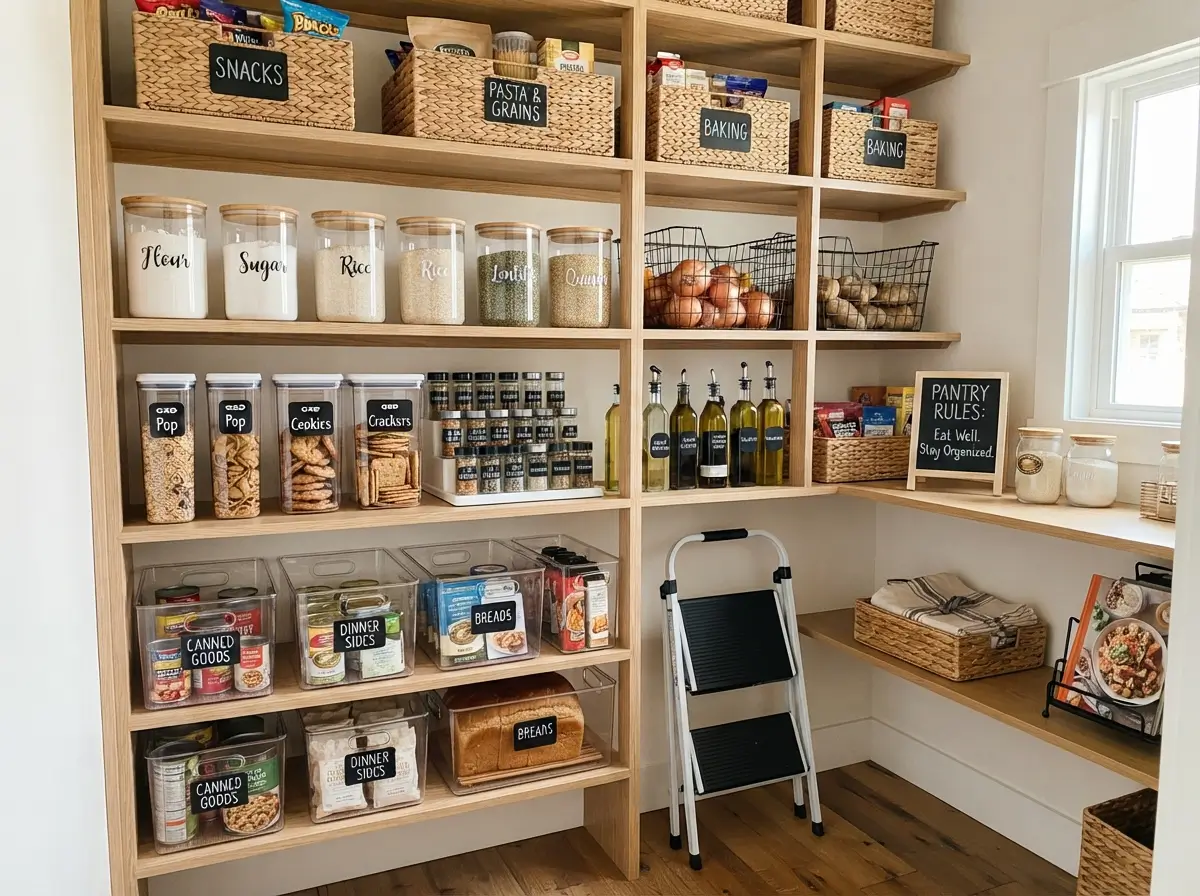

Messy shelves can make even a well-designed kitchen feel stressful. Half-empty packets disappear behind cereal boxes, canned food gets forgotten, and everyday ingredients become difficult to reach. Thoughtful Pantry Organization creates order without requiring an expensive renovation or a large walk-in cupboard. Clear zones, suitable containers, sensible shelf spacing, and a few styling choices can turn crowded storage into a practical part of your kitchen.
Good storage should support the way you cook rather than force you to follow an unrealistic system. Families, renters, busy professionals, and small-apartment residents all need slightly different layouts. Some people benefit from labeled bins while others need open shelves that show every item clearly. Successful results come from matching the arrangement to your available space, shopping habits, and daily routines.
What Is the Best Way to Organize Messy Pantry Shelves?
Short answer: Effective Pantry Organization begins with removing expired food, grouping similar items, creating clear zones, and placing frequently used products between waist and eye level. Choose containers only after measuring the shelves and understanding what you regularly store.
Start with function before appearance. Attractive jars may improve visual consistency, but they will not solve deep shelves, awkward corners, or overcrowded snack packets on their own. Measure the height, width, and depth of each shelf before buying organizers. Then create a simple plan for breakfast foods, baking supplies, snacks, canned goods, dinner ingredients, drinks, and household extras.
Empty Every Shelf Before Rearranging Anything
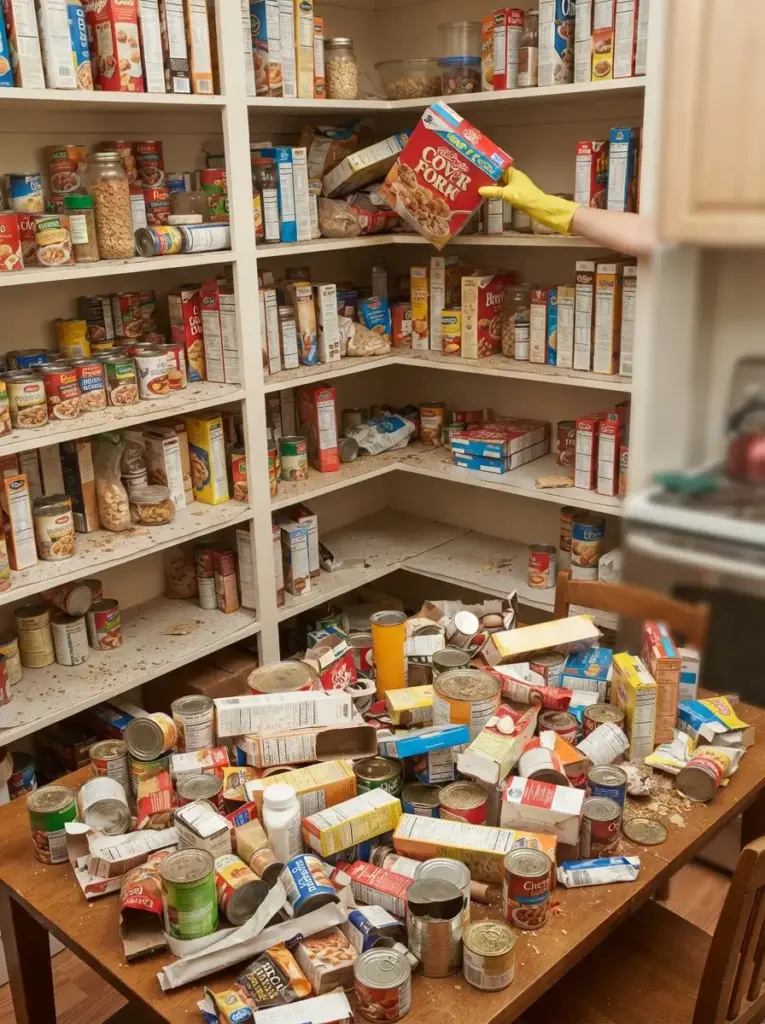
Removing every item gives you a clear view of the available space. Working around existing products usually leads to small improvements rather than a complete solution. Empty shelves reveal sticky spills, damaged liners, forgotten food, and storage areas that were previously hidden behind oversized packages.
Place everything on a dining table, kitchen island, or clean floor covering. Group similar products as you remove them instead of creating one large pile. Keep breakfast items together, place baking supplies in another group, and separate unopened stock from food already in use. Sorting during removal saves time later and helps you see which categories consume the most room.
Full clearing works especially well for beginners who feel overwhelmed by clutter. It creates a visible starting point and prevents random shifting from one shelf to another. Small-space households also benefit because every inch can be reconsidered before products return.
Check expiration dates during the process. Discard spoiled items and set aside unopened food that your household will not use. Suitable products can be donated according to local food bank guidelines. Avoid keeping unwanted ingredients simply because they cost money. Unused food still occupies valuable space and often hides products you actually need.
Clean each surface using a mild solution suitable for the shelf material. Painted wood may require less moisture than sealed laminate or wire shelving. Dry everything completely before replacing liners or containers. Moisture trapped beneath shelf coverings can cause odors, peeling, or damage over time.
Create Zones Based on Daily Kitchen Routines
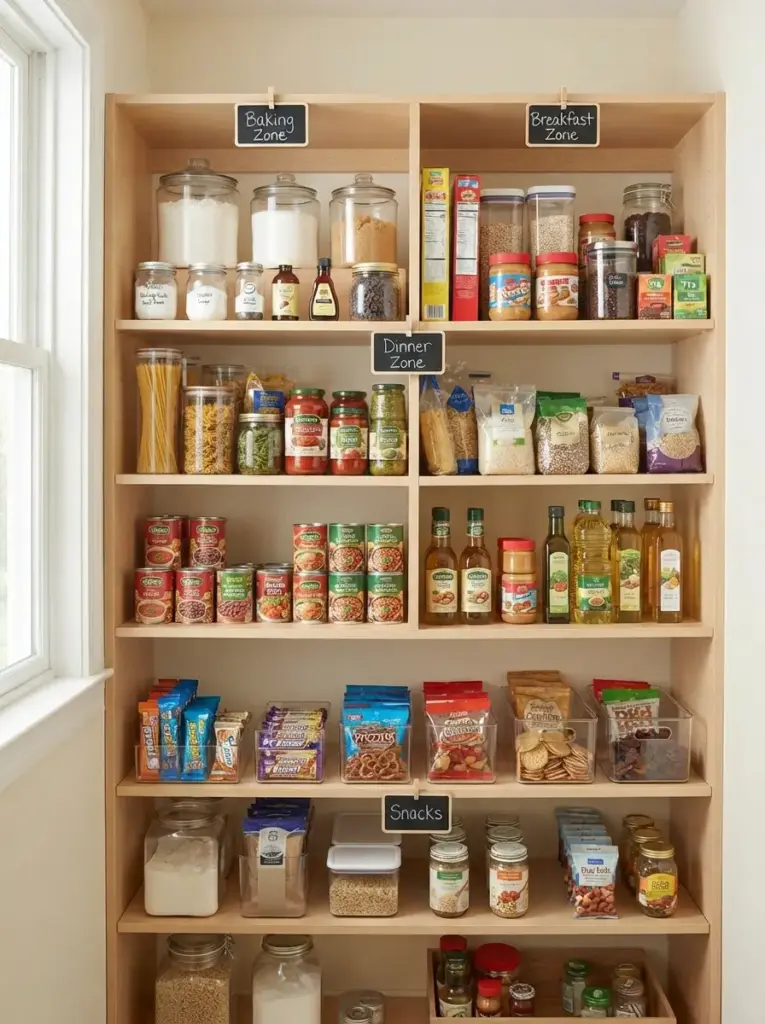
Zones reduce searching because every category receives a defined home. Instead of arranging products only by package size, organize them according to how they are used. Breakfast foods can share one shelf while pasta, sauces, and grains can form a dinner zone.
Morning routines become easier when cereal, oats, spreads, coffee, tea, and breakfast bars remain near one another. Baking sessions feel less disruptive when flour, sugar, extracts, chocolate chips, and decorating supplies sit in a single section. Similar groupings help household members return items correctly without needing complicated instructions.
Zone planning is particularly useful for families and shared homes. Children can access an approved snack section while adults keep cooking ingredients higher. Roommates can divide shelves or maintain communal zones for shared staples. Clear boundaries reduce accidental duplication and make grocery planning easier.
Leave small gaps between major categories. Space acts as a visual divider and gives new groceries somewhere to go. Completely packed shelves may look efficient for one day, but they quickly become messy after a shopping trip. Allowing ten to fifteen percent breathing room creates a system that can adapt.
Consider your kitchen layout when assigning categories. Dinner ingredients belong closer to the food-preparation area when possible. Coffee supplies may work better near the kettle or coffee machine. Storage feels more intuitive when pantry zones connect naturally with nearby kitchen tasks.
Keep Everyday Items at Eye Level
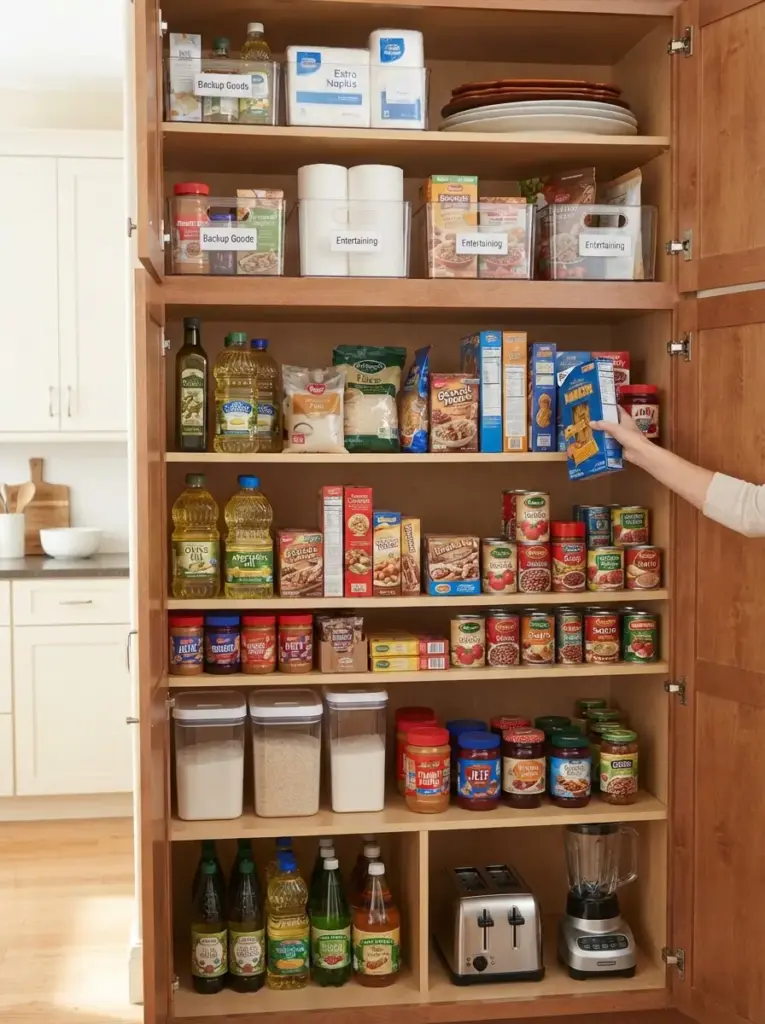
Prime shelf space should support your most frequent habits. Place daily essentials between waist and eye level so they remain easy to see and reach. Products used only occasionally can sit higher or lower without affecting normal cooking routines.
Common everyday items may include cooking oil, rice, pasta, bread, cereal, snacks, canned tomatoes, and lunch supplies. Every household will have a different list. Observe what you reach for during a normal week rather than copying a showroom layout that may not suit your routine.
Easy access matters most for shorter adults, older family members, and anyone with limited mobility. Repeated bending or stretching makes a storage system frustrating. Heavy jars and appliances should remain below shoulder height to reduce the risk of dropping them.
Reserve high shelves for lightweight backup stock, paper goods, seasonal serving pieces, and rarely used ingredients. Lower shelves can hold heavier containers, drink bottles, pet food, or small appliances. Avoid storing fragile glass jars at floor level where feet, children, or pets may knock them.
Shelf placement also improves inventory awareness. Visible staples are easier to track, which reduces duplicate purchases and food waste. Products hidden above eye level should be grouped in labeled bins so the entire container can be pulled forward safely.
Use Clear Bins for Loose Packets and Snacks
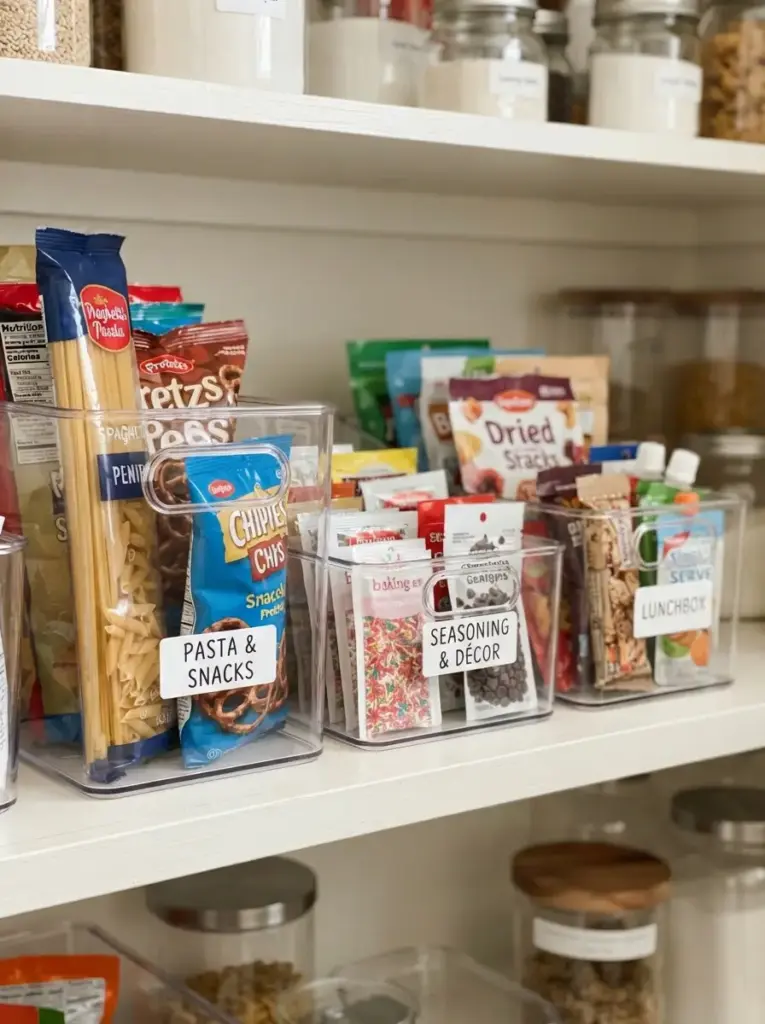
Flexible packets rarely stand neatly on their own. Pasta pouches, snack bags, seasoning mixes, and baking decorations collapse into one another, creating untidy piles. Clear bins hold these irregular packages upright while keeping labels visible.
Choose containers with straight sides whenever possible. Rounded baskets waste space between each unit, while rectangular bins sit closely together. Open-top styles work well for items used every day because products can be grabbed without removing a lid.
Clear storage supports visual inventory. You can quickly see when snacks, wraps, or noodles are running low. Parents may find it useful for lunchbox supplies because children can identify approved choices without opening several containers.
Shallow bins suit narrow shelves and small cupboards. Deeper pull-out bins are better for long shelves where food tends to disappear at the back. Handles make heavy containers easier to remove, especially when they sit above shoulder height.
Avoid buying an identical bin for every category before testing the layout. Different foods need different dimensions. Tall snack bags may require high-sided containers, while small seasoning packets work better in low, divided trays. Measure actual packages and choose organizers around them.
Neutral labels can improve consistency without hiding contents. White, black, kraft, or transparent labels work with most kitchens. Use simple category names rather than highly specific labels that may become outdated when your shopping habits change.
Add Shelf Risers for Cans and Short Jars
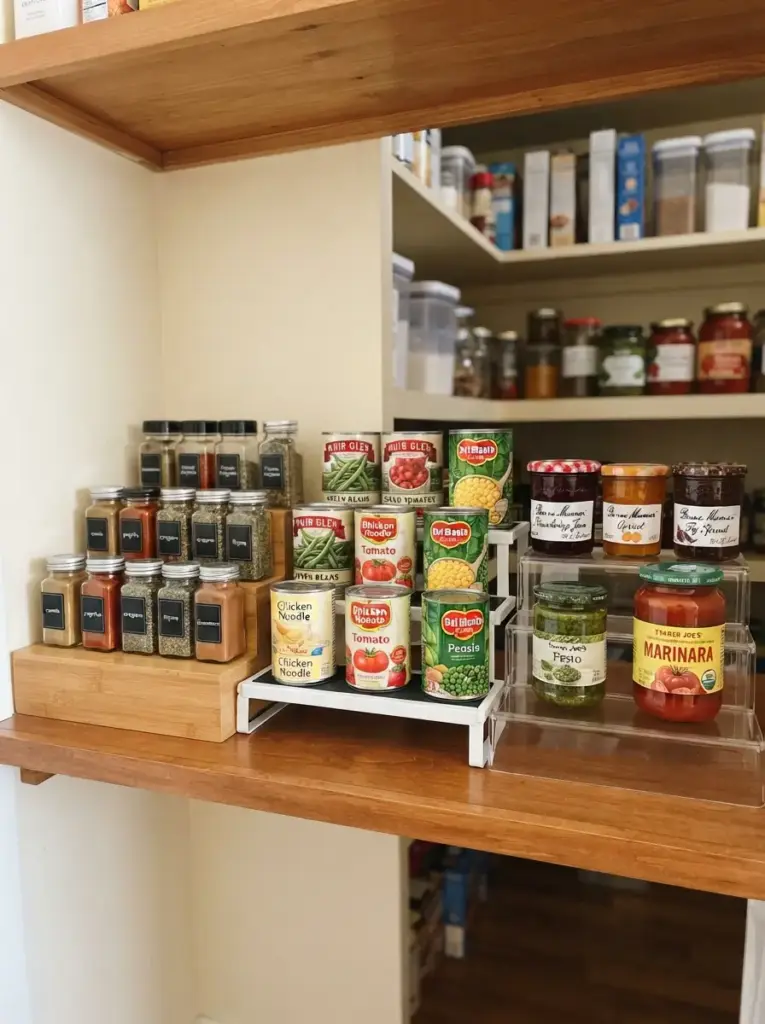
Shelf risers create a second visible level inside a tall storage area. Without elevation, short cans often form several rows, and the products at the back become difficult to identify. Tiered risers lift rear items so their labels remain visible.
Sturdy metal, bamboo, acrylic, and coated wire designs all work well. Select a material that complements nearby finishes. Warm bamboo suits wood cabinetry, while white metal feels clean in bright kitchens. Clear acrylic provides a quieter appearance when you want the food packaging to remain the main visual element.
Risers are helpful for canned vegetables, soup, sauces, preserves, spices, and small jars. Arrange matching categories in rows rather than mixing unrelated products on every level. Grouping provides faster scanning and prevents forgotten stock.
Narrow pantries benefit from expandable risers that fit the shelf width. Renters may prefer freestanding models because they require no drilling or permanent installation. Budget-conscious households can test the concept with strong, stable boxes covered in removable paper before purchasing dedicated organizers.
Check weight limits before filling a riser with glass jars or large cans. Lightweight plastic stands may bend under heavy loads. Place heavier items on the lowest tier and keep smaller products above. Stability matters more than achieving a perfectly uniform display.
Allow enough clearance above each tier. Labels should remain readable, and products should lift out easily. Overfilling the vertical space may make the back row difficult to remove, which defeats the purpose of the organizer.
Decant Only the Foods That Benefit From It
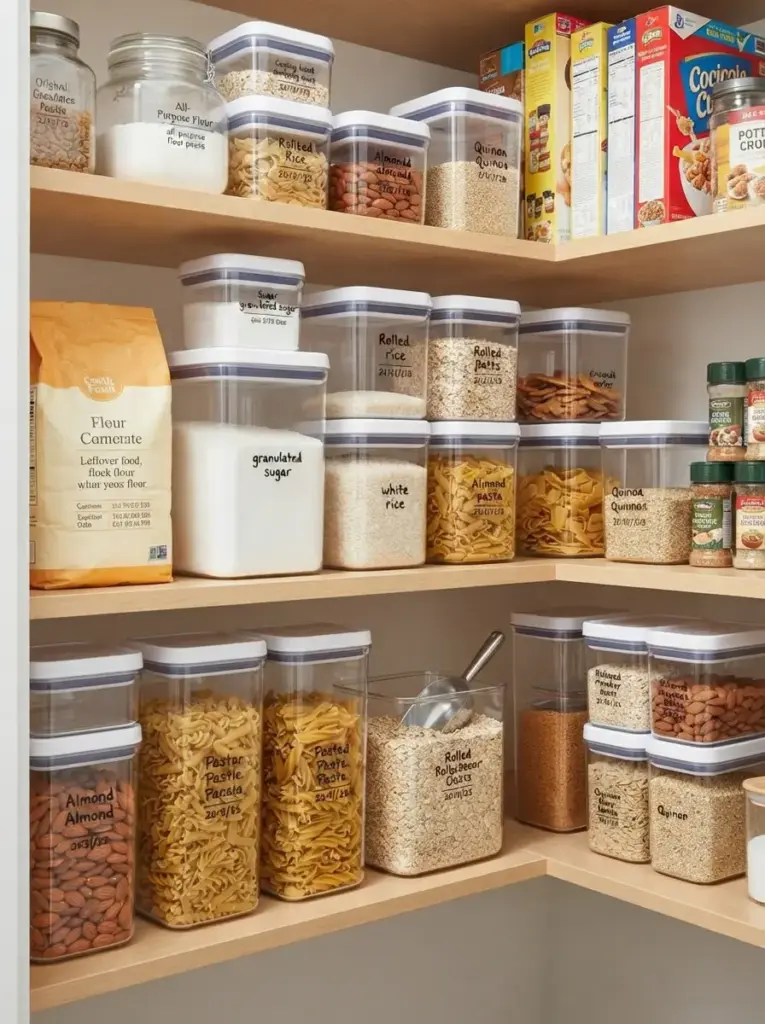
Matching containers can create calm visual lines, but transferring every grocery item is not always practical. Decant products that become easier to pour, stack, or monitor. Flour, sugar, rice, oats, cereal, pasta, nuts, and baking ingredients often benefit most.
Choose airtight containers for foods affected by moisture, pests, or staleness. Square and rectangular shapes use shelf space more efficiently than round jars. Wide openings make scooping easier, while clear sides show remaining quantities.
Decanting works well for people who buy the same staples repeatedly. Households that frequently change brands or package sizes may find it less convenient. Large containers can also become awkward when a new bag does not fit completely, leaving leftover food in the original packaging.
Keep cooking instructions, expiration dates, and allergy details whenever they matter. Cut labels from packaging and place them inside a small sleeve, attach them beneath the container, or write essential information with an erasable marker. Never rely on memory for similar-looking powders.
Uniform containers should not force you to throw away usable products. Finish an existing supply before topping up when possible. Mixing old and new food can hide freshness differences. Wash and dry containers completely between refills, especially when storing flour, nuts, or ingredients containing allergens.
Glass creates a polished appearance but adds weight and breakage risk. Lightweight plastic may suit high shelves or homes with children. Stainless steel containers protect food from light but hide quantity levels. Choose materials according to safety and daily use rather than appearance alone.
Use Turntables in Deep Corners
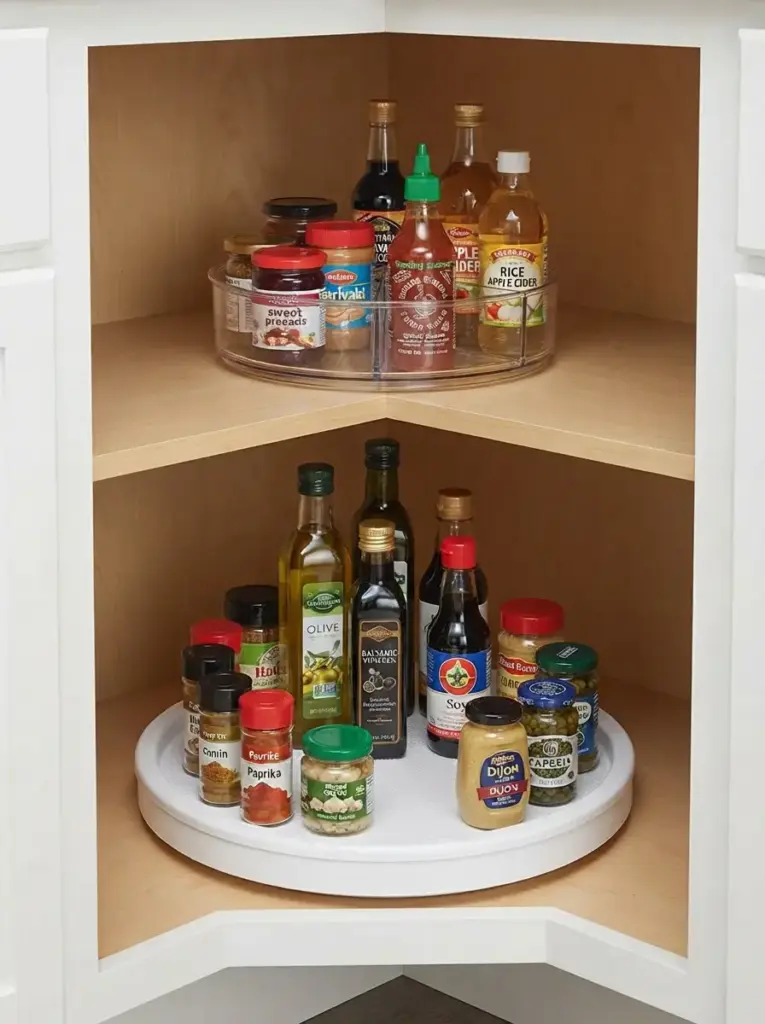
Deep shelves and corner cupboards often waste space because products near the back become difficult to reach. Turntables bring oils, sauces, spreads, condiments, and jars forward with a simple rotation.
Raised edges prevent bottles from falling while the tray spins. Non-slip surfaces help narrow containers remain upright. Divided designs can separate sweet spreads, cooking sauces, and vinegars within one compact area.
Turntables are best for products with similar heights. Very tall bottles may block shorter jars, while oversized containers can make the tray unstable. Arrange taller items near the center and shorter items around the outside when visibility allows.
Corner placement improves access without requiring custom cabinetry. Renters can add freestanding turntables without changing shelves or doors. Small kitchens gain particular value because awkward areas become usable storage instead of forgotten gaps.
Measure the full diameter before purchasing. Pantry doors, hinges, shelf supports, and side walls can prevent a tray from rotating properly. Leave a little clearance around the edge rather than choosing the largest possible size.
Avoid using turntables for soft bags, loose packets, or products that frequently tip. Bins handle those categories more effectively. Rotating trays perform best when each item has a stable base and can be replaced without disturbing the entire group.
Install Under-Shelf Storage Where Space Allows
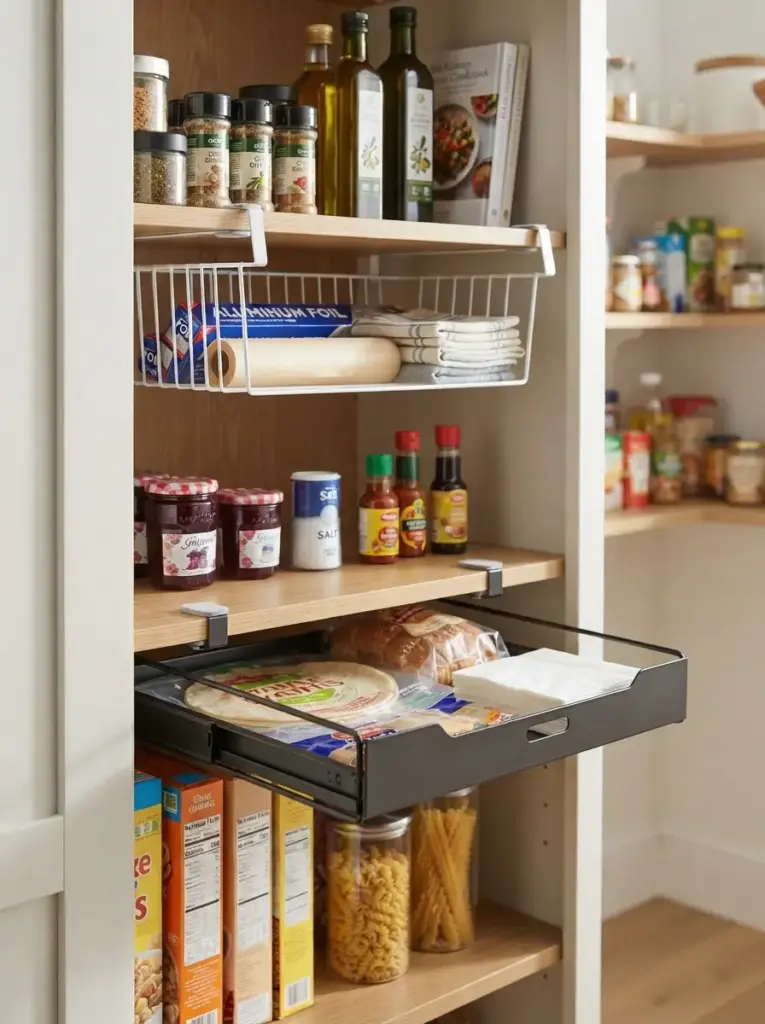
Unused air beneath a shelf can provide valuable storage. Clip-on baskets, hanging racks, and slim drawers create room for wraps, napkins, bread bags, tea towels, or lightweight packets without requiring permanent construction.
Under-shelf solutions work especially well in tall sections where small products leave wasted space above them. Sliding baskets allow you to use that gap while preserving the main shelf surface. Choose low-profile designs so items below remain easy to access.
Rental-friendly models attach with hooks or clips instead of screws. Check that the shelf thickness matches the organizer specifications. Loose attachments can scrape finishes or shift when drawers are pulled.
Lightweight contents are safest. Avoid filling hanging baskets with glass jars, canned food, or heavy appliances. Excess weight may bend wire shelves or damage laminated boards. Bread, wraps, reusable bags, and paper products are more suitable.
Visibility should remain a priority. Deep hanging baskets can create dark areas beneath them or block labels on the shelf below. Select a shallow model and test door clearance before committing to the arrangement.
Soft felt pads can protect painted or wood shelves from metal clips. Clear rubber guards may also reduce movement. Small protective details help renters remove organizers later without leaving scratches or dents.
Store Baking Supplies in One Portable Station
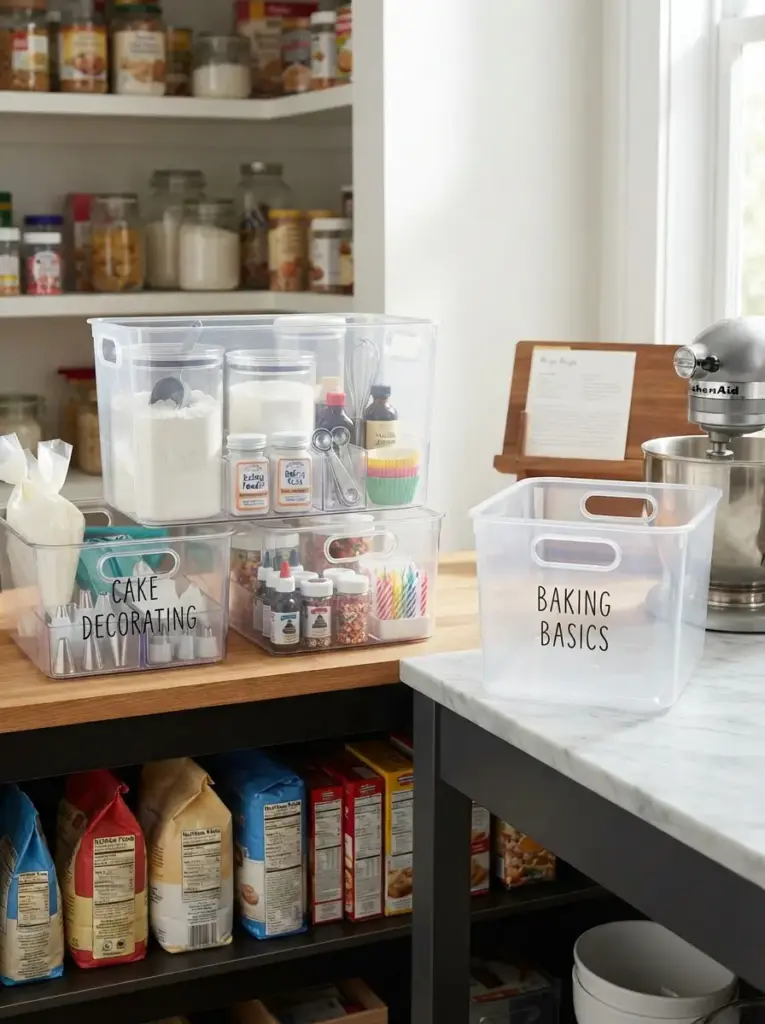
Baking ingredients are often spread across several shelves because packages vary in size. A portable station keeps frequently used supplies together and allows the entire group to move to the counter when needed.
Large handled bins can hold flour, sugar, baking powder, extracts, cupcake liners, measuring spoons, and decorating tools. Separate dry ingredients from small accessories so tiny items do not disappear beneath bags. Divided boxes or smaller containers inside the main bin create a useful structure.
Portable stations suit occasional bakers who do not need prime shelf space for every ingredient. The whole bin can sit on a higher shelf and move down only when required. Regular bakers may prefer an eye-level section with individual containers for faster daily access.
Consider weight before combining everything. Several large jars can make one bin difficult to lift. Divide supplies into two stations, such as everyday baking and decorating, when the category becomes too heavy.
Labels should reflect broad uses rather than individual products. “Baking Basics” remains useful even when ingredients change. “Cake Decorating” can hold piping bags, food coloring, candles, and sprinkles without requiring a new label every season.
Store heat-sensitive ingredients away from ovens, direct sunlight, or warm appliances. Chocolate, nuts, and certain decorations may deteriorate in hot conditions. Pantry placement should support food quality as well as convenience.
Build a Child-Friendly Snack Zone
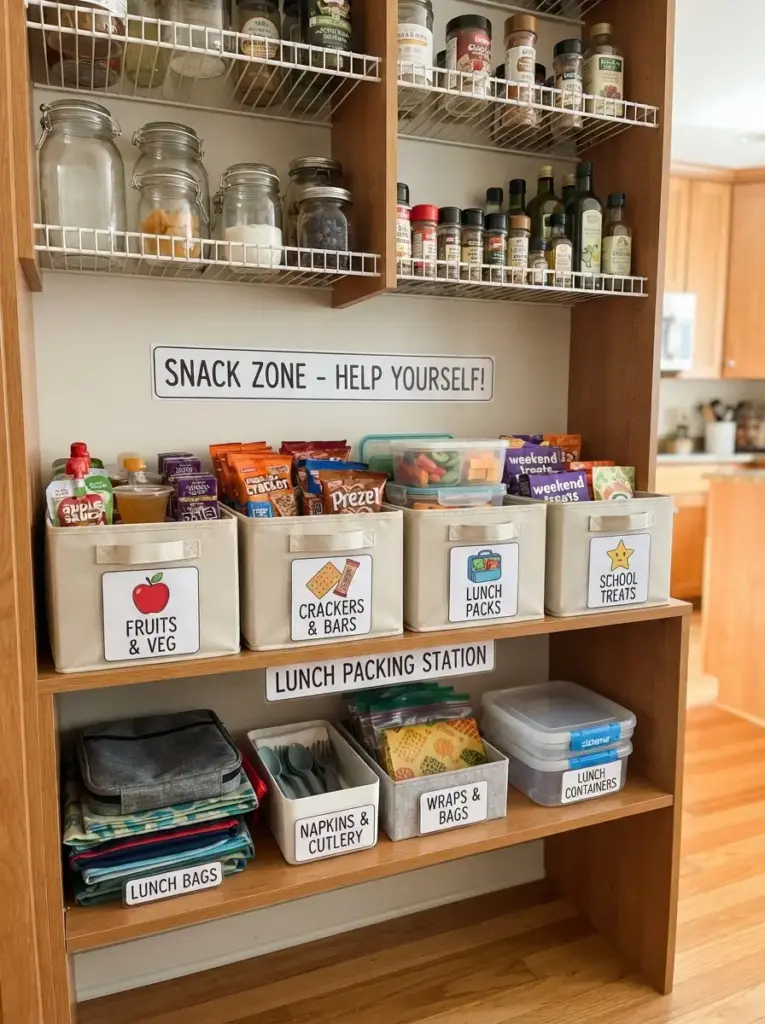
Designated snack storage gives children controlled independence while keeping the rest of the pantry orderly. Place approved snacks on a low or mid-level shelf that matches the child’s age and reach.
Open bins can hold fruit cups, crackers, snack bars, small cereal packets, and reusable containers. Portioning large packages into washable containers may make lunch preparation faster, but avoid unnecessary single-use packaging when a larger bin works.
Parents can separate everyday choices from occasional treats. One basket might hold school snacks while another stores weekend options. Clear categories reduce repeated questions and make limits easier to understand.
Child-friendly zones are also useful for adults preparing lunches quickly. Bags, napkins, wraps, and lunch containers can sit nearby so everything needed for packing remains within one area.
Safety requires careful planning. Keep glass, sharp tools, cleaning products, alcohol, medicines, and choking hazards far from children’s reach. Heavy containers should never sit above a section where young children regularly stand.
Visual labels can support children who cannot read yet. Simple icons for crackers, fruit, or lunch supplies make returning items easier. Use removable stickers so categories can change as routines develop.
Add Warm Lighting to Dark Pantry Areas
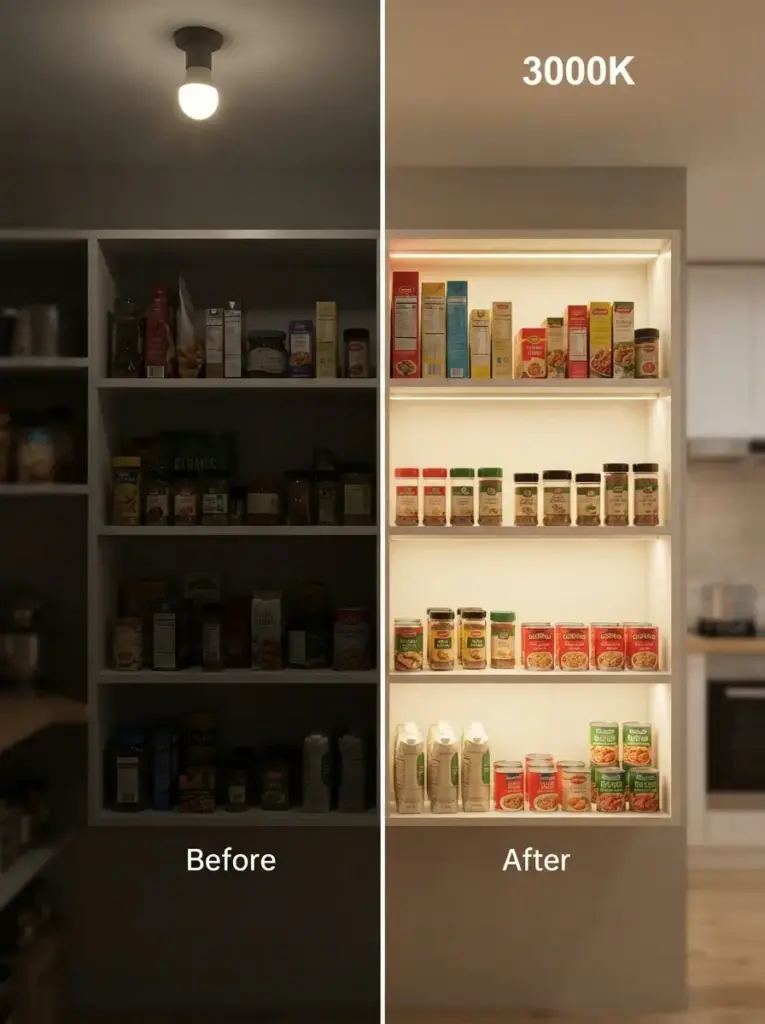
Poor lighting makes shelves appear more cluttered because labels, corners, and small products disappear into shadow. Soft, even illumination improves visibility and makes the storage area easier to maintain.
LED strip lights or rechargeable motion-sensor bars work well beneath shelves and around door frames. Choose warm white light around 2700K to 3000K for a cozy kitchen appearance. Neutral white around 3500K to 4000K provides crisper visibility for labels and food colors.
Battery-powered and rechargeable lights suit renters because they can attach with removable strips or magnets. Check the adhesive on a hidden area before applying it to painted cabinetry. Heat, humidity, and textured surfaces may reduce adhesion.
Motion sensors are practical for walk-in spaces or deep cupboards because the light activates when the door opens. Manual switches may suit open shelving where constant movement would trigger the fixture unnecessarily.
Position lighting near the front edge rather than directly above products at the back. Front placement reduces shadows created by tall containers. Diffused covers soften harsh points of light and produce a cleaner result.
Avoid exposed cords that cross shelves or doorways. Cable clips can guide wires along corners, while rechargeable bars remove the need for electrical installation. Lighting should improve safety without creating a new obstruction.
Use Door Space for Lightweight Essentials
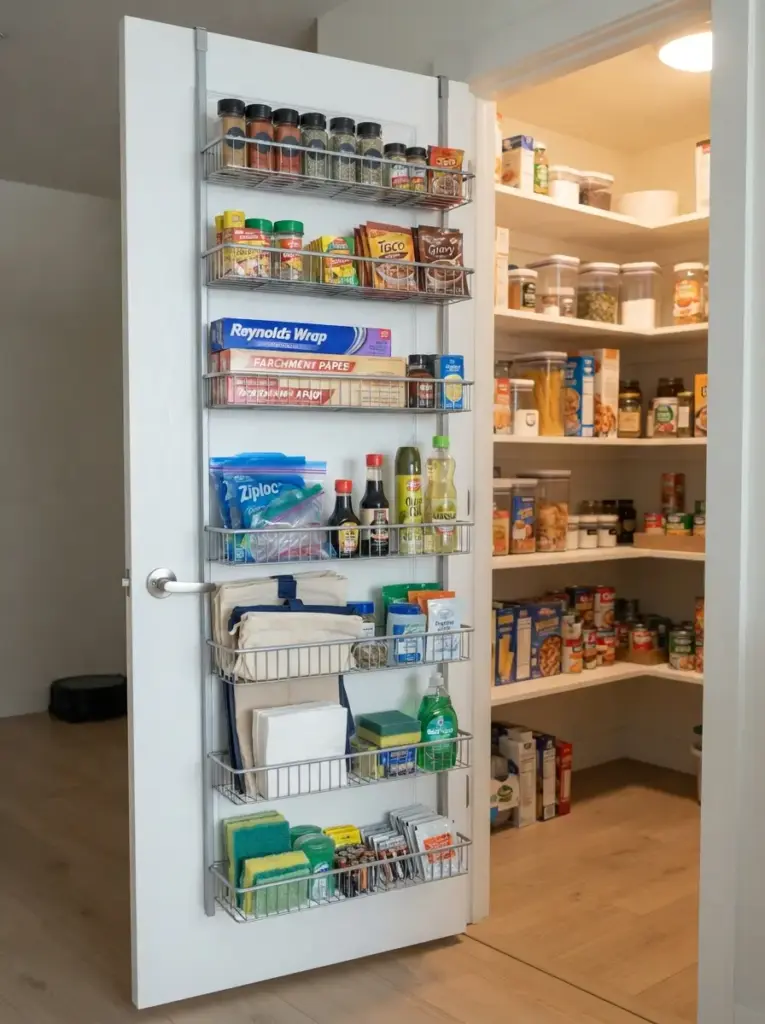
Pantry doors can provide narrow storage for spices, wraps, packets, reusable bags, and small household supplies. Over-door racks make use of vertical space without occupying the main shelves.
Slim baskets work best because deep organizers may interfere with interior shelving when the door closes. Measure the gap between the door and shelf edges before buying anything. Hinges and handles should move freely after installation.
Door storage benefits apartment kitchens and shallow cupboards where every surface matters. Renters can choose padded over-door systems that do not require drilling. Adhesive pockets may also work for lightweight products when the finish can tolerate removable strips.
Keep frequently used products between shoulder and waist height. Lower pockets suit reusable shopping bags or napkins, while upper sections can hold spare packets and lightweight supplies. Avoid placing heavy glass bottles on doors because repeated movement strains hinges.
Noise can become irritating when metal cans or jars hit the rack. Soft liners, rubber bumpers, or fabric pockets reduce movement. Secure tall items with rails so they do not fall when the door opens quickly.
Door-mounted storage should not become a place for unrelated leftovers. Assign clear categories and remove items that no longer fit the purpose. Vertical space remains useful only when the arrangement stays easy to scan.
Label Categories Instead of Individual Products
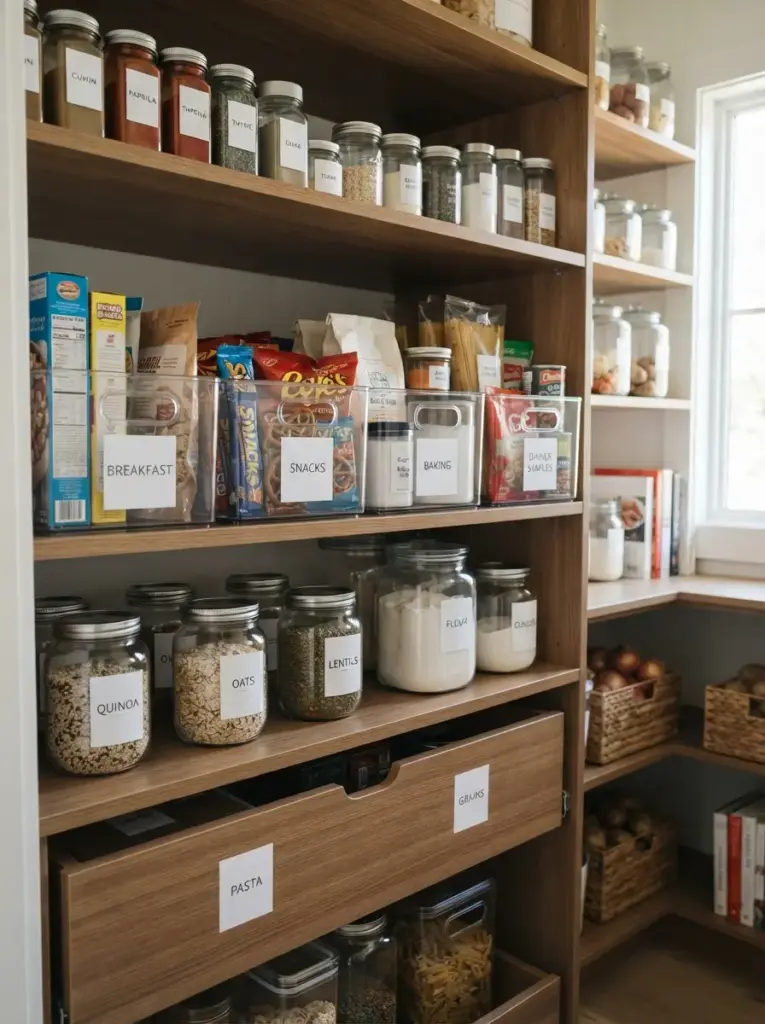
Category labels create structure while allowing flexibility. Labels such as “Breakfast,” “Snacks,” “Baking,” and “Dinner Staples” remain useful even when brands, package sizes, or specific products change.
Individual labels can become restrictive. A container marked for one exact food may sit empty while another category overflows nearby. Broader wording lets the system adapt to changing diets, seasons, and shopping habits.
Beginners benefit from simple labels because they reduce decision fatigue. Family members can return products to the correct general zone without understanding a complex arrangement. Shared kitchens also become easier to maintain when expectations remain clear.
Choose a label style that suits the room without overpowering it. Small black text on white labels feels clean and readable. Kraft paper suits warm wood shelves, while transparent labels blend into acrylic containers. Decorative scripts can be difficult to read, especially in dim spaces.
Reusable options provide better flexibility. Chalk markers, erasable labels, magnetic tags, and removable vinyl can change when categories shift. Permanent labels work best only for long-term staples stored in dedicated containers.
Placement matters as much as design. Position labels so that they remain visible when bins are full. Front-center placement works for pull-out storage, while top labels may suit shallow drawers viewed from above.
Add Vertical Dividers for Trays and Boards
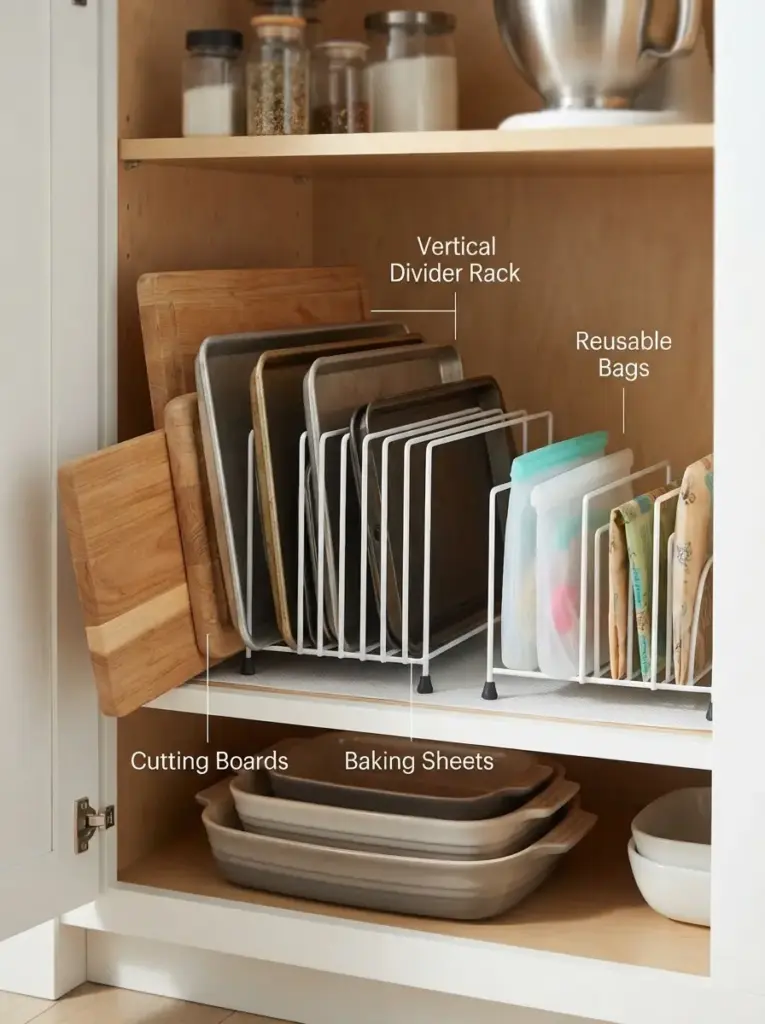
Flat items often create unstable piles. Serving trays, baking sheets, cutting boards, reusable bags, and large wraps become easier to access when stored vertically with dividers.
Vertical arrangement lets you remove one item without lifting an entire stack. It also prevents lightweight trays from sliding across shelves or leaning against food packages. Wire dividers, file organizers, tension rods, and narrow baskets can all create sections.
Small kitchens benefit because thin items use height rather than wide horizontal surfaces. Home cooks who bake frequently may keep sheets near the pantry entrance, while occasional users can place them in a lower section.
Select dividers with enough weight or grip to stay upright. Lightweight plastic organizers may shift when heavy boards are removed. Rubber feet and non-slip liners improve stability on smooth shelves.
Group similar sizes together. Large cutting boards can share one section while shallow trays occupy another. Avoid forcing oversized pieces into narrow gaps because edges may chip or organizers may bend.
Tension rods offer a rental-friendly option when installed carefully between sturdy surfaces. Check them regularly because changing temperatures or repeated pressure can loosen the fit. Freestanding racks provide greater stability for heavier items.
Leave a Flexible Shelf for Changing Needs
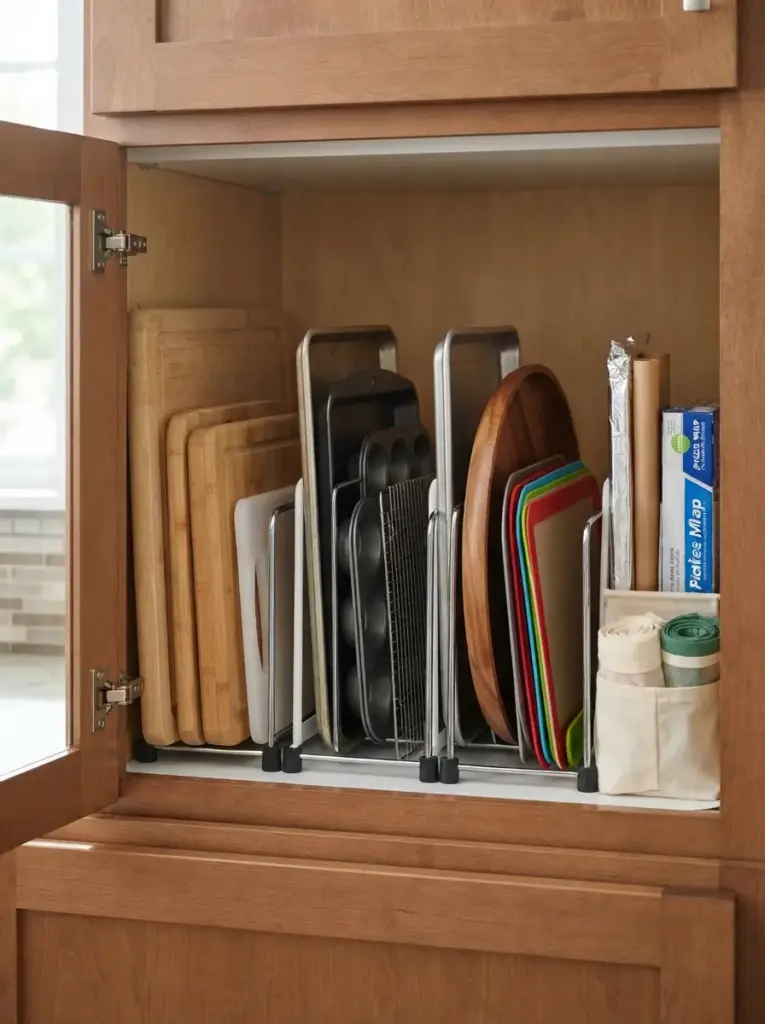
Flat items often create unstable piles. Serving trays, baking sheets, cutting boards, reusable bags, and large wraps become easier to access when stored vertically with dividers.
Vertical arrangement lets you remove one item without lifting an entire stack. It also prevents lightweight trays from sliding across shelves or leaning against food packages. Wire dividers, file organizers, tension rods, and narrow baskets can all create sections.
Small kitchens benefit because thin items use height rather than wide horizontal surfaces. Home cooks who bake frequently may keep sheets near the pantry entrance, while occasional users can place them in a lower section.
Select dividers with enough weight or grip to stay upright. Lightweight plastic organizers may shift when heavy boards are removed. Rubber feet and non-slip liners improve stability on smooth shelves.
Group similar sizes together. Large cutting boards can share one section while shallow trays occupy another. Avoid forcing oversized pieces into narrow gaps because edges may chip or organizers may bend.
Tension rods offer a rental-friendly option when installed carefully between sturdy surfaces. Check them regularly because changing temperatures or repeated pressure can loosen the fit. Freestanding racks provide greater stability for heavier items.
Common Pantry Mistakes to Avoid
Overbuying organizers before measuring is one of the most common mistakes. Attractive sets may not fit shelf depth, package height, or door clearance. Measure first, test a small number of products, and expand only after confirming that the layout supports daily use.
Decanting every ingredient can create unnecessary work. Decorative jars require cleaning, refilling, labeling, and space for leftover packaging. Transfer only foods that gain better freshness, visibility, or stackability from a container.
Ignoring household habits causes systems to fail quickly. Children may not return snacks to high shelves, and busy cooks may not use organizers with difficult lids. Observe natural routines and build storage around them.
Packing shelves too tightly removes flexibility. Grocery trips introduce new sizes, seasonal products, and unexpected extras. Leave small gaps so products can move without causing a complete rearrangement.
Using deep bins for tiny items can hide products at the bottom. Match container depth to the category. Shallow trays suit seasoning packets, while tall bins work for chips and bulky snack bags.
Placing heavy objects too high creates safety problems. Large glass jars, appliances, and drink bottles should remain below shoulder level. Higher shelves are better for lightweight stock and rarely used paper products.
Choosing style over visibility can also create frustration. Opaque baskets may look calm, but they make inventory harder to monitor. Use them for visually messy categories that you check regularly, not for food likely to expire unnoticed.
Forgetting dates leads to waste. Place newer purchases behind older products and create a small “use first” section for items nearing expiration. Rotation matters more than achieving perfect rows.
Budget-Friendly Ways to Improve Pantry Shelves
Start by reusing containers already in your home. Clean food jars, sturdy shoe boxes, gift boxes, and small delivery cartons can separate categories during the planning stage. Matching finishes is less important than testing whether the system works.
Cover reused boxes with removable wallpaper, kraft paper, or plain adhesive vinyl for a more consistent appearance. Neutral shades such as warm white, soft gray, beige, sage green, and muted blue blend easily with common kitchen finishes.
Repurpose magazine holders for foil, baking paper, slim cutting boards, or pasta packets. File organizers can separate trays and boards. Small office trays often work for seasoning mixes, tea bags, and snack bars.
Use washable shelf liner instead of replacing damaged shelving. Light colors improve visibility in dark cupboards, while subtle patterns hide minor marks. Avoid thick liners that make containers wobble.
Shop for organizers gradually. Begin with the most difficult shelf rather than purchasing a complete matching collection. Solving one problem at a time usually produces a more practical result and spreads expenses across several weeks.
Check discount shops, home clearance sections, secondhand stores, and online resale listings for baskets and risers. Confirm measurements before buying because low prices do not make unsuitable products useful.
Printable or handwritten labels cost very little. Consistent lettering and placement can make mixed containers feel intentional. A black marker on a white card creates a clear result without requiring a label printer.
Adjustable tension rods provide low-cost vertical dividers for lightweight trays. Removable hooks can hold measuring cups, reusable bags, or small baskets on suitable surfaces. Always follow weight limits and test adhesives discreetly.
Practical Pantry Organization Tips for Beginners
Begin with one shelf when the full space feels overwhelming. Completing a small section creates visible progress and teaches you which containers, labels, and categories actually suit your habits.
Measure before every purchase. Record shelf width, height, depth, door clearance, and any obstructions such as hinges or support brackets. Keep these measurements on your phone while shopping.
Group products according to use rather than appearance. Meal-based categories often feel more natural than arranging food only by color or packaging. Breakfast, lunch packing, baking, snacks, and dinner staples provide clear purposes.
Place older food in front and newer purchases behind it. Simple rotation helps prevent waste and makes grocery planning more accurate. Check the pantry briefly before writing a shopping list.
Choose easy maintenance over complicated styling. Pantry Organization should reduce effort after grocery trips rather than create a long decanting routine. Open bins, broad labels, and visible stock usually work well for busy households.
Schedule a five-minute reset each week. Return misplaced products, remove empty packaging, wipe spills, and move soon-to-expire food forward. Frequent small resets prevent the need for another complete overhaul.
Keep a small step stool nearby when upper shelves are part of the design. Stable access is safer than standing on chairs or countertops. Foldable stools can fit beside a refrigerator or inside a utility cupboard.
Avoid storing food directly beside strong-smelling cleaning products. Separate household chemicals in a secure area, especially in homes with children or pets. Food zones should remain clean, dry, and protected.
Frequently Asked Questions
How do I organize a pantry without buying containers?
Begin by sorting products into clear categories and assigning each group a shelf. Reuse sturdy boxes, clean jars, bowls, trays, or small baskets already available at home. Labels made from paper or masking tape can create order while you test the layout. Containers improve certain categories, but thoughtful placement and regular rotation make the biggest difference.
What should go on the top pantry shelf?
Store lightweight, rarely used products on the top shelf. Suitable choices include backup paper goods, seasonal baking supplies, extra snack packets, disposable serving items, and unopened lightweight stock. Avoid heavy glass jars, large appliances, or bulky drink bottles because lifting them from above shoulder height can be unsafe.
How can I organize a very deep pantry?
Use handled pull-out bins, turntables, tiered risers, and clearly labeled backstock sections. Place similar products together so you can remove one container instead of reaching behind several packages. Keep frequently used items near the front and reserve the deepest area for unopened extras or rarely used supplies.
How often should pantry shelves be reorganized?
Small resets work best once a week, especially after grocery shopping. Check expiration dates and clean the shelves every one to three months, depending on household size and food turnover. A complete reorganization is usually unnecessary when the original layout supports your habits and receives regular maintenance.
Are clear containers better than baskets?
Clear containers improve visibility and help you monitor quantities. Opaque baskets hide colorful packaging and can create a calmer appearance. Choose clear storage for food that expires quickly or needs regular tracking. Use baskets for stable categories such as napkins, reusable bags, pet supplies, or individually wrapped snacks.
What is the easiest Pantry Organization method for beginners?
Start with broad zones, place everyday products at eye level, and use open bins for loose packages. Avoid transferring every ingredient into matching jars during the first attempt. Live with the layout for two weeks, notice what becomes messy, and adjust only the categories that create problems.
Conclusion
Organized shelves should make cooking, grocery shopping, and daily routines easier. Begin by clearing the space, checking dates, measuring carefully, and assigning practical zones. Add bins, risers, turntables, labels, and lighting only where they solve a specific problem.
Small improvements can create meaningful changes without expensive cabinetry or a large walk-in room. Rental-friendly organizers, reused boxes, adjustable dividers, and rechargeable lights can improve access while protecting existing surfaces.
Reliable Pantry Organization grows from realistic habits rather than showroom perfection. Keep frequently used products visible, leave room for changing needs, and complete brief weekly resets. When every category has a sensible home, messy shelves become easier to manage, and the entire kitchen feels calmer.